MTU Karaoke Software for Everyone!
Karaoke Software for Windows 10, Windows 8.1

The Original and Still #1
Karaoke Software!

Easter Specials!

40% Off Software! Ends Soon!
Coupon Code: EASTER24


919-870-0344

Microeditor Digital Audio Editor Software

The Ultimate Audio Editing/Mixing Software

NOTE: Microeditor Requires a Krystal DSP Card...
That is Now Out of Production And No Longer Available

 
Microeditor 5.5 Software new purchase or upgrade(Requires Krystal DSP card to run) $250.00 Microeditor on CDROM
 

Since 1980, Microeditor has evolved to the fastest, most flexible and creative audio editing software on the market. Simply stated, it allows ultimate creativity faster than you have ever dreamed. Click here to read how users create perfect mixes -- every time!

Non-destructive? How about editing recorded audio files still on a CD-ROM! Every delete edit, fade in and out ramp change or amplitude cut or boost edit... not to mention that all recorded files are safe even from power loss. By removing all your fears, you will even "think non-linear". You will create that elusive "Perfect Mix" every time! Click here to read how others felt about their first perfect mix!

Notice! If you need the limitations of tape recorders and software that duplicate them, then Microeditor is too flexible and creative for you.

You can adjust anything in any order, free of undo levels, mixing live while playing. When more than 17 stereo segments with fade and gain changes play at the same time, only those areas automatically renders to disk, or you can group segments (percussion set, etc.) and render them to accomplish the impossible on any speed computer.

When you need effects, use the built-in commands, or add up to 8 direct-x plug-ins simultaneously on each segment or the entire project.

Click here and read how users capture every fleeting creative spark because Microeditor responds at thought-speed. You simply polish the mix to creative perfection.

Microeditor is a 32-bit Windows 2000/XP program. Much of its code is written in DSP assembly requiring the Krystal DSP audio card to deliver the ultimate speed and audio quality. There are many unique features pioneered by MTU at the requests of our clients. Please read on to discover how Microeditor is designed for you.

One Screen - Record Edit, Assemble and Mix

The screen appears "simple" by design. An uncluttered screen is easy to use, and stimulates efficient, creative production. From 22 years of polishing, the Microeditor "tool set" works the way you think. Microeditor projects can open in under a second regardless of their length or complexity.

The Title Bar at the top shows the open project name and disk path. Click here to see the commands in the File, Segment, Group... menus. Click here to see the icons and buttons around the screen. These are part of the operating "tool set." Some tools perform the same task in different ways to allow working in your own style on each type of project. The various fields display information to work efficiently, keeping the screen uncluttered.

The narrow line in the Time line Window across the screen represents the project length. Here you can instantly Audition play or move the View window, even in multi-hour projects. The dotted play cursor moves while playing, the rectangular View box shows the project area magnified in the View window below, and you can mark an area of the project to operate on.

Project screen image
click to see a large image

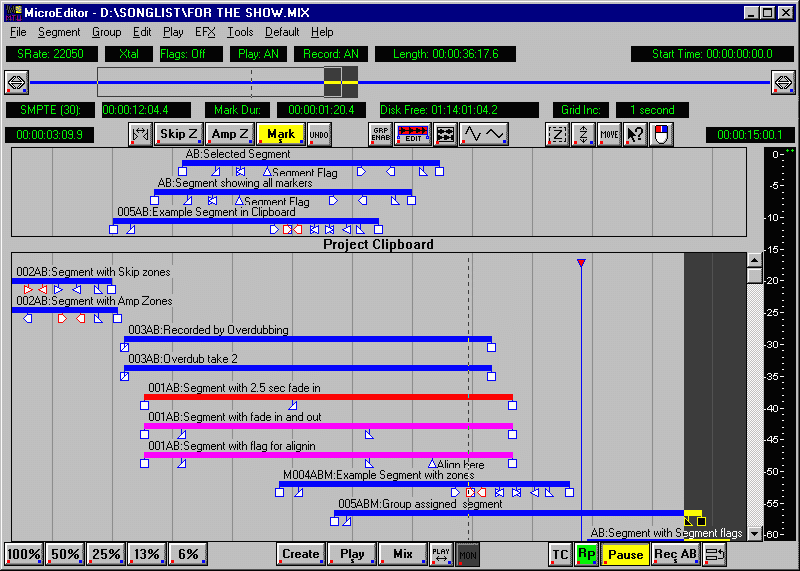
The Project Clipboard can hold hundreds of segment, retaining them when the project closes and reopens, and it disappears when empty.

The large View Window at the bottom is the creative, free form audio palette where you assemble segments into projects. The position of a segment in the project determines when it plays. They freely move on unique Floating-Tracks, magnetically snapping to various features, always to sample accuracy. The window magnification can zoom in to sample precision, or out to show more of the project, and can instantly move anywhere. With more than 16 segments overlapped, vertical scroll bars appear (right above) to access them.

Creativity - Total Unlimited Freedom

Fears kill creativity. You fear running out of tracks with tape recorders and track or virtual-track based workstations. They can only play the fixed number of tracks they have, or "bounce" multiple tracks down to one. If your tool ever damages your work, you fear it will happen again. Self-acclaimed "non-destructive" workstations frequently crash daily or weekly and loose all current work... even erasing master recorded files that should be safe on disk!

Creativity requires instant response and freedom from all fears. Slow systems are so frustrating you avoid making desirable edits. Microeditor Thought Speed editing and mixing encourages perfection. There are no real or perceived penalties to try anything. Click here to read how users produce up to 32 times more the first day! They fearlessly try anything with these unique Microeditor features:

Random Access Editing Frees you to edit and adjust anything in any order without undoing anything.
Floating Tracks Frees you to adjust segments into perfect sync, no more shuttling tape, or punch in/out, or the physical limitations and mental restrictions of fixed tracks.
Disk Layering Frees you to overlap over 64,000 sounds to play together anywhere, removing the fear of ever running out of tracks.
Project-Editing, Frees you to focus on creating a perfect project, free of all fears, frustrations and stress.

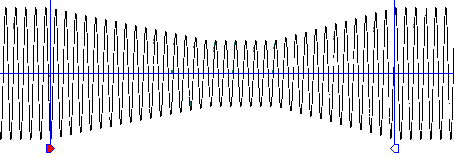
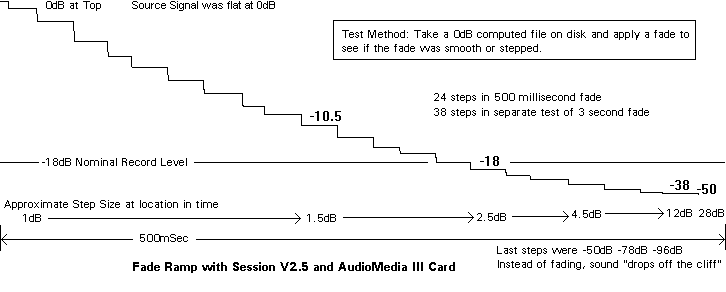
When your ears hear what is in your "minds´ ear," you are satisfied you have attained perfection. There is only the calm creative flow of listening and polishing each area. Mixing on Microeditor you do not need to "calm down" because you do not get "pumped up". However, the electric excitement of creating "perfect" mixes is very energizing!

Instant performance, fearless creativity, reliability and ultimate quality make Microeditor different from all other systems. As you experience the total freedom, your right brain takes over for true creativity. Fredrick Brooks, .D., the father of the IBM 360 mainframe computer, wisely said "A computer is a Brain Amplifier." Microeditor is designed as the ultimate tool to amplify your creative abilities; to become the best audio artist you can. Click to read how easy it is to use.

Reliability - Safe Even With Lost Power!

Microsound removes your fear of loss, but fears die slowly. One day, you wake up and realize... Microsound hasn't crash... it hasn't lost my files... you give up this fear and your creativity soars even higher!

Worldwide clients have never lost or had master audio files or projects damaged since shipments started in 1989. All files and edits are safe even from a power loss or computer lock-up. With 380 auto-pilots and error traps, operation is so safe, users rarely think of saving current work. You are unaware of the automatic backup until a disaster hits... and even your last edits reappear! No other editor on the market even comes close to the non-destructive, ultra-stable reliability and speed of Microeditor. Click here to read clients' stories who used other workstations. As you create perfection, meet your schedules... and keep your clients... you will laugh all the way to the bank!

[Page Top]

Quality - Always Crystal Clear

Digital processing can damage or deliver perfect quality. All workstation designers make tradeoffs between quality, cost and speed. Click here to read how Microeditor users testify to absolute quality. Microeditor computes every sample live on-the-fly, with fades smoother than a hand on a fader can perform. It processes and mixes with 24-bit samples and 56-bit accumulators, with MTU proprietary algorithms to convert back to 16- or 24-bits. This delivers crystal clear audio as close to "straight wire with gain" as possible, even when digitally amplifying up to +48dB. If a workstation does not allow digital amplification, they made quality tradeoffs that increase noise... otherwise they would provide this flexible feature!

There are four ways audio editing programs can change amplitudes from recorded levels, each with their own tradeoffs.

  1. Compute live on-the-fly for every sample. Changes play instantly, smooth, distortion free, and preserve master audio files. This is the only professional way to change gains and fades. Example: Microeditor!
  2. Compute live on-the-fly with 20-30 stair steps per second.Click here to see a plot from a Digidesign fade Changes play instantly, sound abrupt, can create pops or clicks at each step, add muddy in-harmonic distortion in fade areas, and preserve master files. Mixing more than three overlapping fades produces unacceptable distortion.Example: Digidesign Session, D-Vision.
  3. Compute new audio files on disk that play instead of the original files. Changes are delayed before playing, are smooth, frequently clicks occur where fade files start/end playing, preserve master files, and can be undone. Some workstations using this method take 5 to 10 minutes just to open a project! Example: Sonic Solutions, Spectral Inc., Digidesign Protools uses both stair steps and takes 3x the fade length to compute and store to disk.
  4. Destructively modify master audio files. Changes play after very long delays, are smooth if step fades are not used, should be distortion free if computed properly, permanently modify master audio files, and cannot be undone. This is the worst form of destructive editing, used by MIDI Sequencers and inexpensive audio editing programs. Example: Sound Forge, Cakewalk Pro Audio, Cool Edit.

Clearly one technique delivers the quality, is the fastest and stimulates creativity. Microeditor! Now that you know this, we can move on.

Non-Linear - Do Anything Anywhere

MTU was the first to ship a non-linear audio workstation and considers the following to be the correct definition:

  1. The audio on the hard drive must be randomly accessible versus playing linearly through disk tracks
  2. You must be able to jump anywhere and play instantly in any file
  3. You must be able to randomly adjust or remove existing edits in any order
  4. You must be able to assemble audio components (segments) without restrictions (such as tracks)

So how does MTU and the competition stack up?

Function Microeditor Competition
Hard Drive Use Random access Random access
Playing Play anywhere instantly Most play linear through the project, some with extended delays
Editing Random adjust in any order Multi level undo, edits permanent past max level
Assembling Random assembly in audio palette with no restrictions linear assembly limited to the fixed # of tracks
Simultaneous Sounds Unlimited, with up to 72 playing live from one hard drive Limited to tracks of system, usually 10 mix live. Note: Virtual Tracks can only swap with others
User Focus Fearless to create anything Constrained by fear of track limits, limited levels of undo, requirement to undo to access a prior edit

Many systems take minutes to perform simple delete edits or gain changes, or permanently degrade the files and quality. They require undoing edits, have a limited number they can undo, and play linearly through the project, all proving they are linear devices! With this total non-linearity, your thinking even becomes non-linear, free to polish any area instantly... amplifying your creativity!

Segment Based Editing - The Heart of Microeditor

Microeditor pioneered Segment Based Editing, never modifying master files. Segments provide instantaneous, non-destructive, non-linear editing and totally stress-free mixing. Segments are simply pointers into master recorded disk files that can be 16- or 24-bit sample resolution. All delete edits and amplitude envelope changes apply to the segments, never modifying the master files. Segments allow editing audio files permanently stored on CD-ROM discs!

Segments specify what areas to play from master audio files, when they play in the project, and their edits, fades, gains and effects layers control how they play. Copies of segments in a project can play the same audio, but each with different edits, amplitude envelopes and effects. Multiple projects can play segments from the same audio files at the same time... because Microeditor is totally non-destructive!

In the project View window, segments appear as horizontal boxes located where they play. They show their name and other indicators and edit markers below (this example is over-stuffed with markers) that can instantly adjust. The amplitude can be made to fade up by graphically moving the fade in Fade in marker marker to the right to adjust the fade duration. Moving the fade out marker Fade out marker to the left changes the duration for fading the segment amplitude back down to zero. Skip zones [Skip Zone Markers] must first disable to adjust their markers, while Amp zone [Amp Zone Markers] markers can adjust any time. Either zone can be disabled and remain so, appearing as Skip zone disabled or Amp zone disabled, preserving the edit, but removing the effect. Click here for details on all the indicators and markers. Everything about a segment can be instantly edited directly in the View window or in the graphic waveform Edit view.

Segments automatically create when you stop and approve a recording. Mono files create segments with 1 audio stream, or instantly change to stereo, computing the second track while playing instead of using disk space. Stereo files create segments with 2 audio streams that always preserve the stereo image field no matter what you do. Click here for more ways to create segments.

The Segment Attributes Dialog Box

Segment attributes dialog box

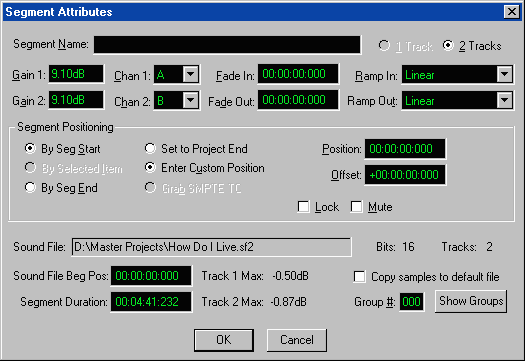
This dialog automatically appears when recording stops, or is available any time for each segment to change its parameters. Click here for details on each attribute.

Non-Destructive Random Access Editing™ Even On CD-ROM Files!

Under stress and in the early morning hours mistakes happen... or recording on location has undesirable sounds... and clients always want changes. Editing is any change that enhances the final product, frequently making real-world audio sound perfect. It is a basic requirement that must be easy and efficient to perform. The edit-hear-adjust-hear cycle must be fast to make editing fun and creative.

Our non-linear and non-destructive Random-Access-Editing ™ allows adjusting anything instantly without undoing anything else. Even with thousands of edits, each is instantly adjustable... if it sounds wrong, fix it! You quickly polish to perfection... free of stress... even late at night... even with demanding clients. With Microeditor, you will make perfect edits and mixes... and go home early!

In 1988, MTU was the first to pioneer two obvious yet totally unique approaches to deleting unwanted audio sections. Having both tools gives maximum creativity and efficiency.

Split Segments to Edit or Arrange the Play Order

For example, if all the songs for a CD are recorded into one file and create one segment, each song can be split off as separate segments. Then, dragging each segment to it's new position to rearrange the song order for the CD, adjusting silence gaps as desired. If a segment is assigned to a group, splitting it keeps both parts to that group, but either can change.

Most audio editors delete by splitting out unwanted audio on a track. This creates many small regions to name and manage. Often a simple mistake (easy at 3AM), computer lock-up or power loss destroys every region AND the master files. WARNING! These editors are advertised as non-destructive!

Deleting With Skip Zones is Natural

Simply click and mark across the area with the mouse center button. Releasing the button adjusts the marking to prevent a pop or click, inserts the zone markers, redraws the View window and plays across the edit for approval in seconds. Skip zones can also insert while playing by pressing start and stop keys. [Before Skip]
The segment instantly shrinks by zone area. Delete breaths, lip smacks, long pauses, clicks or pops inside words, or long phrases. Skip zones allow you to delete this which is what you are thinking, versus use that which disrupts your focus. [After Skip]
If a skip zone is detectable, disable it. The deleted area reappears and the adjustable markers separate. Microeditor encourages edit perfection by polishing what exists. Systems using undo editing remove edits, so you blindly make another bad edit in a difficult area. Do you see the difference? [Disabled Skip]
To numerically adjust a zone's parameters, click either of the zone [Image] markers and right click the [Skip Zone Button] button or the Edit Zone command. The dialog box at right appears to add fades and/or a delay. For example, when deleting a word in a run-together pair or triplet of words add fades for a perfect edit, or add a delay to adjust the cadence after removing an unwanted sound. Skip zone dialog box

Most editors require removing (undoing) good edits to return to a prior one that is likely an edit in a difficult audio area. Once you have undone edits to get back to it, you must undo it. Thus, you now get a second change to blindly make another bad edit in a difficult area! Once their maximum number of edits that can undo is exceeded (usually between 1 and 10, some to 100), they destructively modify the master audio files! WARNING! Remade edits in other systems are never as good as the original because you are frustrated by having to do them again!

With Microeditor, you edit as fast as you think. While creating an award winning song remix, you think split it here and move it in front. When you hear a click inside a spoken word, you think that's got to go, instantly add a skip zone to delete it and keep going. You could remove the click by splitting the segment and rearranging the pieces, but this takes ten times longer and is impossible to adjust like a skip zone. You will make perfect, undetectable edits, but clients or producers like to make changes. Instead of groaning or saying NO, you simply disable and adjust it, starting from what was already there, not blindly like undo editors. Microeditor gives you the ultimate flexibility to perfect every edit... at Thought Speed!

[Page Top]

Record - All the Ways

Recording is the process of loading new audio material into the computer hard drive for use. Clicking the Record field in the Project screen selects between Analog, or digital AES/EBU or SPDIF as the hardware port to record in. The digital inputs can record 16- or 24-bits, preserving the stereo image sound field. Clicking the Play field selects the hardware port to play out. You can choose to record into mono or stereo files automatically created for the open project, or into files you custom create.

Left clicking the Record button instantly starts recording channels A and B (or left and right for digital ports) into the stereo default file. Shift-clicking the button toggles the title to record channel A (or left for digital digital) into the default mono file. Clicking the pause button stops recording samples to disk, but shows them on the peak meters and plays them if the Monitor icon is enabled. Clicking Pause off continues recording to disk. When you stop record, the Segment Attribute dialog box appears to create a segment from the new audio. You can name the segment (29 characters) and change many of the parameters. If the recording was mono and the open project is stereo, you can instantly make the segment 2 tracks, computing on the fly instead of consuming more disk space. Approving this dialog creates the segment and places it in the project. Click here to see more details on recording.

Left clicking the RP icon enables manual triggering record while playing to record a singer or musician in sync with the music, or a voice talent in sync to video (with the Time code icon enabled). At any time while playing, click the record button to start recording. When you stop, a segment automatically appears in sync in the project.

Right clicking the RP icon enables automatic triggering record while playing. This is the equivalent on a tape recorder of setting Punch in/out points to record. However, new recorded samples do not overwrite existing audio. To set the start and stop locations to record, either mark the desired area or select an amp zone. While playing, recording auto-triggers at the mark or zone start and automatically stops at their end. The dialog appears to name the segment and mute it if desired (for multiple takes). The segment automatically positions in the project with the marked area or below the selected zone. Pressing space-bar again executes the same sequence. Segments stack up below each other if triggered with the same marking or zone. After recording multiple takes, select the best or split them and use the best from each to build a perfect take.

Right-clicking the Record button presents the Record window below. It allows; recording 1 or 2 channels with only the in/out ports on the Krystal DSP audio card, or up to 4 channels with the Microsound I/O module. into custom mono and/or stereo sound or wave files, inserting marker flags while recording, triggering to SMPTE, and specifying a duration to record. Pause, Record/Stop and the peak meters work the same as in the Project screen.

[Record New Audio Screen]

Graphic Waveform - Clear and Exact Always

Clicking the [Edit Segment Button] button displays the waveform for the selected segment. The edit markers can graphically click and drag to sample precision or adjust numerically in dialog boxes. The [Scale Amplitude Display] button visually attenuates or amplifies the display vertical waveform axis to show the lowest bits of every sample. The waveform is quickly created from the master disk samples, always working at sample accuracy for perfection, so you don't even think about it (click for user and magazine proof). The view window can easily zoom down to see individual sample precision.

Other systems build "view files" that limit the waveform resolution, can misrepresent the audio playing, and cause slow downs that seem like an eternity.

[Waveform Edit View]

Play - Instantly Hear Your Edits

Playing is far more important than you may think. When the edit-play-approve cycle occurs at Thought Speed, you instantly polish to perfection. Our unique non-linear Audition Play™ instantly plays starting at the mouse arrow, continuing while holding the mouse right button. Pressing the left button also plays double-speed. Skip zones, fades, gain changes and mixing overlapping segments simply play on-the-fly. You instantly hear the edited mix, able to creatively adjust each area to perfection! Audition play is one of MTU's technology breakthroughs that enables perfect editing and mixing. Click here to see the other play operations. Microeditor is designed to amplify your creativity!

Segment Amplitude Envelope - Engineering the Mix

The heart of professional mix engineering involves three basic amplitude adjustments; overall loudness, fading up and back down, and changes to parts of words or notes. When you can instantly change these to equal what is in your "mind´s ear," you attain perfection. Microeditor computes all these elements on-the-fly while mixing and playing to allow you to instantly hear your changes.

On-screen fader controller

Adjusting the Segment Overall Amplitude

Adjusting the Fader lever instantly changes all track gains identically in; a selected segment, a group of segments, or all segments in the project. The adjustable range from the recorded level is +/-20dB in 0.5dB increments, with multiple adjustments providing up to +48dB and down to -100dB. The Segment Attribute dialog box Gain 1 and Gain 2 fields numerically show and control each track amplitude.

The Normalize command will scan every sample in every segment being processed and adjust their track gains to a selectable level. This processes an individual segment, all in a group (individually or as a group), or all in the project (individually or as a project).

Adjusting Segment Fade In and Out Ramps

In a mix, it is best for each sound to fade up at the proper time, and later fade back out. Microeditor segments have built-in fade in [Image] and fade out [Image] markers that show where the fade in ends and the fade out begins. The fades are independent (asymmetrical), with each up to 3 minutes at 44.1kHz. They can adjust graphically by shift-click and dragging, or numerically in the Segment Attributes dialog. The dialog box further allows selecting each fade curve type as; Linear, Logarithmic, Exponential, Equal-power Sine and more. Microeditor calculates fades on every sample on-the-fly while playing to deliver the highest quality possible... instantly! They are smoother and more precise than a hand on a fader can ever perform.

Local Gain Changes Within Segments

An Amp zone can insert across a marked area of a segment to amplify or attenuate the area from +48dB to -100dB (silenced). The Zone dialog box appears or it can be default set to preset values and to not appear.

Waveform with amp zone Amp zone local change

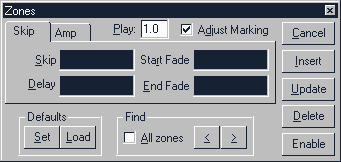
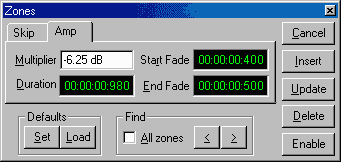
The dialog box allows adding start and end fades to smooth the transition to the new level. The zone markers [Image] can adjust graphically any time by shift-click and dragging, or using the dialog box for exact numerical entries. Disabling a zone Amp zone disabled removes the gain change effect, but preserves the work done to create it... and it can be enabled again any time. Two Amp zones touching each other changes the gain from one to the other over a fade duration. A selected Amp zone can be used as punch in/out points to over-dub record a replacement segment for the zone.

[Page Top]

Mixing - Changed Forever!

Ultimately, your professional status is defined by the quality and creativity of your audio mixing. A singer needs to be heard above the music (or sometimes not). Music needs to duck down under the sales message. On-location recordings frequently sound better by adjusting amplitudes.

Mixing on a manual console is a stressful event. Adrenaline (the fight-or-flight hormone) speeds up your ear-hand coordination to controller the fader instantly. This makes your whole body tense and stressed. The tapes (or disk tracks) are rolling live and you are moving each fader... but hands don't move perfectly... especially at 3am. In milliseconds your mind weighs the degree of every mistake. You might keep rolling, but subconsciously know this is not that "elusive perfect" mix. When it's unacceptable you stop, rewind, reset the board and roll again... with controlled frustration. When done, you have take a break and let the Adrenaline calm down. For an artist, it's a taxing job.

Can you imagine creating every mix perfect...
without stress... and deliver ahead of schedule?

Microeditor transforms mixing from a stressful event, into a pure creative process of polishing to perfection. Up to 256 stereo segments (512 tracks) can overlap at any point that mix as you play. That's it. No mix console, no confusing mix screen. Whether editing dialog, multi-track mixes or sound designs, all changes compute instantly at Thought Speed ! If you don't like it, decide what to change and instantly play it. Adjusting the segment amplitude envelopes is the mix automation, moving with each segment as you adjust them on the free form audio palette. Many multi-track systems store automation on tracks, which requires re-mixing the project after moving an audio piece, and many only apply effects to entire tracks!

Click to read how users create that "elusive" perfect mix their very first session! Keyboard Magazine's testing proved the best of 9 other professional workstations live mix 10 mono tracks, using a proprietary SCSI disk. However, Microeditor mixed 20 stereo segments live (that's 40 mono tracks) on a Pentium 166MHz computer using a slow IDE drive and the standard Windows format.

On an MTU Microsound workstation, Microeditor can dynamically mix and play up to 72 tracks on-the-fly (36 stereo segments at 44.1kHz, 300MHz Pentium II, one SCSI 10,000rpm drive, Windows NT). With one IDE drive and Windows 98, up to 34 tracks (17 stereo segments) can mix and play live, each with fade in, fade out and gain changes from the recorded level.

There is a number of segments overlapping where dynamic mixing will sputter, requiring static mixing (rendering) to disk. You adjust the number of overlapping segments where static mixing is required. Before playing, only the dense areas quickly static mix (or render) to disk, playing instantly from then on. Unlike bouncing, after static mixing each segment is still visible and adjustable. Using intelligent methods, only edited areas need to remix. Thus, even the slight delay of editing in static mixed areas becomes painless. Segment Grouping (see below) allows overlapping and sub-mixing up to 20 stereo segments (40 tracks), and up to 256 of these can overlap and static mix (256x40= 10,240 tracks)! Static and Dynamic mixing provide maximum creativity and remove the fear of track limitations!

Have you ever seen a 64,000 track console?
It´s free with Microsound!

An automated console takes longer to roll and adjust and far more frustrating than Microeditor. Workstations or programs that emulate tape recorder tracks (even so called "virtual tracks") must bounce multiple tracks down to one for more sounds than their limited tracks... just like those good old tape recorders! Forget about single track adjustments within the bounce; creativity is down the tube, and the frustration ruins your creativity! Systems that permanently modify files also frequently lose quality with each edit pass, reducing final mix quality. Aren't these the reasons you want to leave your analog tape recorder and console... or slow digital editing workstation?

Microeditor mixing computes with 24-bit precision. Even projects using 16-bit sound files can output digitally as valid 24-bits after fades, gains and mixing, sounding better to human ears than many competitor's 24-bit sounds! Microeditor is always digitally pure throughout the mix. When you realize that every sample is processed for perfect quality while also mixing live... at a price you can afford... you start to understand the depth of uniqueness.

Grouping - For Really Dense Mix Areas

Segments can assign into up to 999 groups when more are overlapping than you can handle... like running out of fingers on a mix console. Groups simplify handling similar segments, such as 12 percussion tracks in a song, or a sound design with 18 overlapping effects for sweetening a video or film. The Project screen image above shows overlapping segments assigned to groups 001, 002, 003, 004 and 005. Grouping is currently enabled, thus the red selected segment turns the other 001 segments magenta to show the group is selected. When needed, the Group Enable icon temporarily disables grouping to process individual segments. Groups can have segments with 1 or 2 audio streams playing to hardware output channels.

The Combine Group Segments command sub mixes (renders) a group to disk, then appears as a single segment that plays the sub-mixed sound. This simplifies the display showing only one segment in place of the multiple it now plays, and reduces the load on the hard drive. Combining allows up to 20 segments to overlap in a group at any point, but thousands can be in a group. However, each of these 20 segments can be a combined segment with 20 sub-mixed within it, and each of those 20 can be combined segments!Microeditor totally removes the fear of ever running out of tracks.

When combined, the individual segments in the group are hidden underneath the new segment. Executing the Uncombine Groupcommand instantly displays the individual segments to re-engineer their mix. This completes the Project-Editing paradigm to allow an infinite number of tracks to play simultaneously, on any Microsound workstation and... be randomly adjustable following MTU's non-linear definition. Once a group is engineered, its sound can be processed as a single segment. Click here to see more details.

Copying a combined segment retains the encapsulated sub-segments and reversing the combine operation does not affect the original. This allows engineering the sub-segments in the copy different from the original. Thus, any change can be tested in front of a client. If the copy sounds better, delete the original and use the copy.

[Page Top]

Effects Processing - Layers on Segments

Microeditor allows adding multiple effects processing layers to individual segments, groups of segments, or the entire project. There are several ways to get any desired effect on a segment.

Apply direct-x plug-in effects using up to 8 plug-in effects modules as a new effect layer, rendering the new samples to disk, never modifying the master files. These are stored on disk differently from master audio files that are never modified. Click here for a list of current built in effects.

Apply a built-in Microeditor effect as a new effect layer, rendering the new samples to disk, never modifying the master files. These are stored on disk differently from master audio files that are never modified. Click here for a list of current built in effects.

Normalize a segment, a group of segments or all in the project, independently or as a group or project modifies the segment track gain attributes without computing a new sample layer on disk.

Copies of segments easily create many effects with more control than usually possible. For example, add Echo reverb using multiple copies of the same segment, each delayed 50 to 250 milliseconds and with reduced amplitudes. For special effects, fade the echo copies in and out, or amplify a word with an Amp Zone in an echo segment. A single segment copy delayed 0.25 to 10 milliseconds from the original creates a rich variance of flanging and phasing sounds. Grouping and combining these segments creates one segment that can receive any segment processing.

Click here for the DNoise master page.

Effect Send segments out to external analog or digital effects processors. The recorded "effects wet" segment positions in sample alignment below the original. This gives total freedom to adjust the wet/dry mix... more of the Project-Editing paradigm to adjust anything any time.

Third Party DSP plug-in programs can process Microeditor master audio .wav files or all or parts of projects mixed and saved to disk. Microeditor 5.3 and higher supports Direct-X plug-in DSP programs.

Other Programs - Processing Wave Files

Microeditor uses the standard Windows format IDE or SCSI hard drives. Thus, all Windows programs can use these .wav files. Microeditor includes a multimedia device driver to allow any program using this technique to record and play through the Krystal DSP Engine's analog, AES/EBU or SPDIF input/output ports. Sample rates from 8kHz to 48kHz are supported. Running other programs at the same time with Microeditor is acceptable if they do not use the Krystal DSP Engine.

Recording into .wav audio files allows any Windows DSP programs, MIDI Sequencers, etc. to process or use these files. If a DSP program modifies a master audio file, Microeditor segments from those files instantly play the new file sounds. Most popular DSP programs are known to work with Microeditor files.

MIDI Sequencer programs can use Microeditor .wav files to playback under MIDI control. Users find editing and mixing in Microeditor to be more creative, polished and higher quality than Sequencers designed to do MIDI. They record, edit, assemble and mix in Microeditor, then save the project as a .wav file, playable by the Sequencer. Any changes to the Microeditor mix are easy and fast, re-saving to the same filename.

Defaults - Work Your Way on Each Different Job

The easy to use interface is logical and understandable, performing all production phases in the single Project screen. Choose the right tool from many for each operation, and customize defaults for your preferences to appear when Microeditor runs. You can create multiple Microeditor icons on the Windows Desktop, each with unique defaults. These give instant access to different types of project setups or for multiple users such as radio producers or university students. This keeps everyone happy as their personal preferences are not changed by others. Click here to see default details.

Network - Record and Mix From Remote Drives

Any Local Area Network (LAN) that works under Windows with any hardware card (10Mb or 100Mb Ethernet, Token Ring, etc.) can access Microsound files. Segments from files on remote drives can play or edit over the network. The number of segments mixing live is determined by the network bandwidth. When a segment is created (or any time later), the samples can copy into the mono or stereo project default files. This frees the network, and removes all ties to the remote file.

Context Sensitive Help Pages and Manual

Microeditor is very logical and easy to learn and use. If you have questions, the on-line context sensitive Help reference pages are always available. Clicking the Help icon, then clicking any field, button, icon, window, menu or command displays the Help page for that item. Hyper links between pages and pop-up glossary definitions answer navigate you quickly to associated information. The Help Index displays an alphabetical list of words and phrases and all associated pages. Clicking the "?" in the upper right corner of any dialog box instantly displays a pop-up message for the button, field. etc. clicked next. The Microsound printed manual is rewritten for every software release for clear and direct answers.

The Dream Machine

Microsound answers an audio producers´ dream for total creative freedom, ultimate quality, instant productivity and absolute reliability. Contact us now so Microeditor can start today to amplify your creativity. Whether you desire a studio-ready Workstation with single-vendor support, or choose a Peripheral for your PC, we invite you to join our family.

[Microeditor Home Page]